Container-based Virtualization
关于容器虚拟化的相关机制。
1. Container
- 容器概念始于 1979 年提出的 UNIX chroot,它是一个 UNIX 操作系统的系统调用,将一个进程及其子进程的根目录改变到文件系统中的一个新位置,让这些进程只能访问到这个新的位置,从而达到了进程隔离的目的;
- 2000 年的时候 FreeBSD 开发了一个类似于 chroot 的容器技术 Jails,是最早期,也是功能最多的容器技术。Jails 英译过来是监狱的意思,这个监狱(用沙盒更为准确)包含了文件系统、用户、网络、进程等的隔离;
- 2007 年 Google 实现了 Control Groups,并加入到 Linux 内核中,为后期容器的资源配额提供了技术保障;
- 2008 年基于 CGroups 和 Linux Namespace 推出了第一个最为完善的 Linux 容器 LXC。
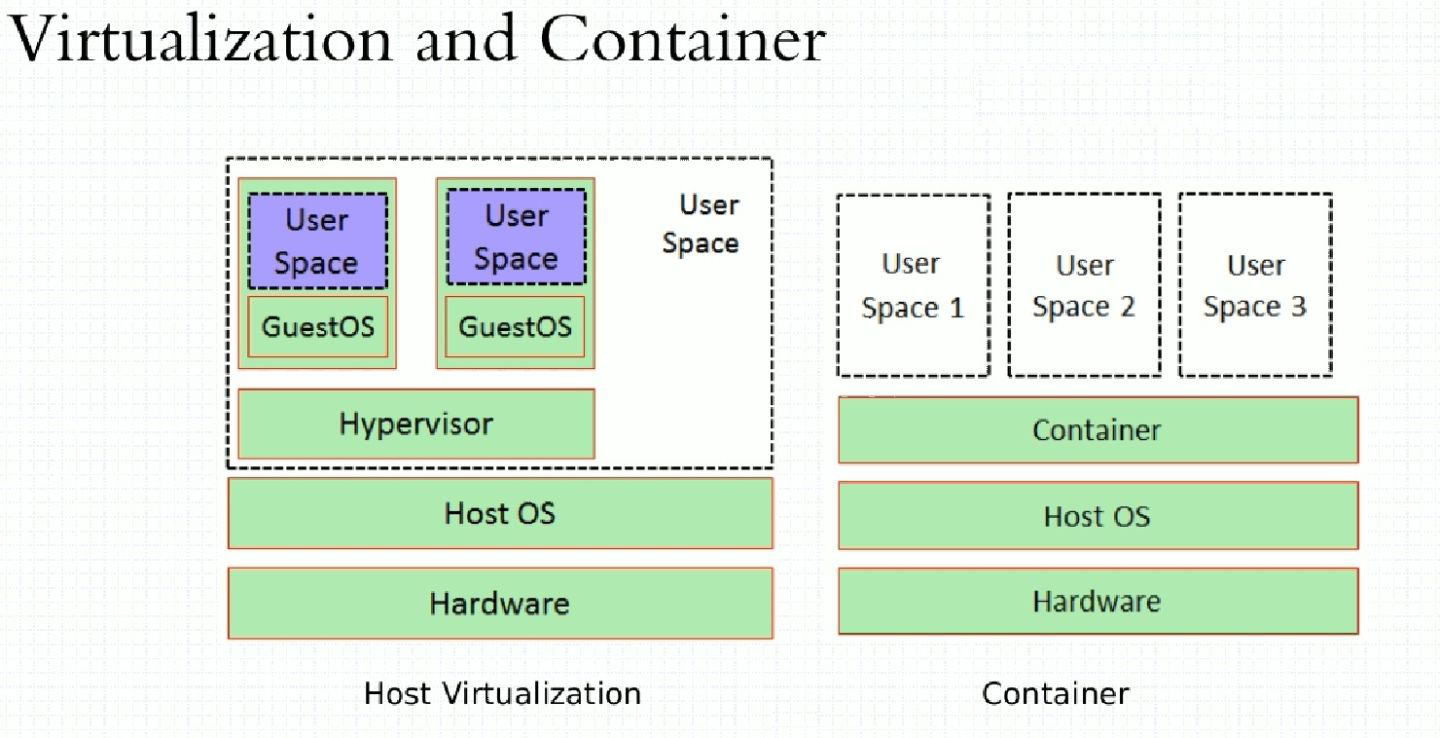
容器化和虚拟化的区别:
2. 内核特性
一般来说,容器技术主要包括 CGroup 和 Namespace 这两个内核特性。
2.1. CGroup
Linux 内核提供的一种可以限制、记录、隔离进程组所使用的物理资源(如:CPU、内存、I/O 等)的机制。将一组进程放在放在一个控制组里,通过给这个控制组分配指定的可用资源,达到控制这一组进程可用资源的目的。这些资源包括 CPU,内存,存储,网络等。通过 CGroup,可以方便的限制某个进程的资源占用,并且可以实时的监控进程的监控和统计信息。在 /sys/fs/cgroup 下可以查看各个分配资源的子系统:
$ ls -l /sys/fs/cgroup
total 0
dr-xr-xr-x 5 root root  0 Dec 10 09:27 blkio # 为块设备设定输入/输出限制,比如磁盘、固态硬盘、USB等物理设备
lrwxrwxrwx 1 root root 11 Dec 10 09:27 cpu -> cpu,cpuacct # 使用调度程序提供对CPU的CGroup任务访问
lrwxrwxrwx 1 root root 11 Dec 10 09:27 cpuacct -> cpu,cpuacct # 自动生成CGroup中的任务所使用的CPU报告
dr-xr-xr-x 6 root root  0 Dec 10 09:27 cpu,cpuacct
dr-xr-xr-x 2 root root  0 Dec 10 09:27 cpuset # 为CGroup中的任务分配独立CPU和内存节点
dr-xr-xr-x 5 root root  0 Dec 10 09:27 devices # 选择允许或拒绝CGroup中的任务访问设备
dr-xr-xr-x 2 root root  0 Dec 10 09:27 freezer # 挂起或恢复CGroup中的任务
dr-xr-xr-x 2 root root  0 Dec 10 09:27 hugetlb # 对HugeTLB系统(大页文件系统)进行限制
dr-xr-xr-x 6 root root  0 Dec 10 09:27 memory # 设定CGroup中任务使用的内存限制,并自动生成内存资源使用报告
lrwxrwxrwx 1 root root 16 Dec 10 09:27 net_cls -> net_cls,net_prio # 使用等级识别符(classid)标记网络数据包,可允许Linux流量控制程序(tc)识别从具体CGroup中生成的数据包
dr-xr-xr-x 2 root root  0 Dec 10 09:27 net_cls,net_prio
lrwxrwxrwx 1 root root 16 Dec 10 09:27 net_prio -> net_cls,net_prio # 设计网络流量的优先级
dr-xr-xr-x 2 root root  0 Dec 10 09:27 perf_event # 允许perf工具基于CGroup分组做性能检测
dr-xr-xr-x 5 root root  0 Dec 10 09:27 pids # 对某个控制组中进程和线程的总数进行限制
dr-xr-xr-x 5 root root  0 Dec 10 09:27 systemd # 由systemd自己维护的目录,用于方便使用CGroup中一些功能
2.1.1. pids
子系统 pids 主要的功能是限制 CGroup 及其所有子孙 CGroup 里面能创建的总 task 数量(包括进程和线程)。systemd 已经把各个子系统和 CGroup 绑定并挂载好了,我们可以直接使用:
$ mount | grep pids
cgroup on /sys/fs/cgroup/pids type cgroup (rw,nosuid,nodev,noexec,relatime,pids)
在 pids 下创建子 CGrouup example,该文件夹下会自动生成一批文件。这里主要关注 pids.current(当前 CGroup 及其所有子孙 CGroup 中现有的总进程数)和 pids.max(当前 CGroup 及其所有子孙 CGroup 中允许创建的最大进程数):
$ mkdir /sys/fs/cgroup/pids/example
$ ls /sys/fs/cgroup/pids/example
cgroup.clone_children  cgroup.procs  notify_on_release  pids.current  pids.max  tasks
$ cat /sys/fs/cgroup/pids/example/pids.current
0
$ cat /sys/fs/cgroup/pids/example/pids.max
max
设置子 CGroup 的 pids.max 为 1,并把当前 bash 的 PID 写入 cgroup.procs。再执行任何命令时(调用 fork())都会报错:
$ echo 1 > /sys/fs/cgroup/pids/example/pids.max
$ echo $$ > /sys/fs/cgroup/pids/example/cgroup.procs
$ ls
bash: fork: retry: No child processes
bash: fork: retry: No child processes
bash: fork: retry: No child processes
此时打开另一个 bash 查看子 CGroup 中的 pids.max 和 pids.current 均为 1,且上一个 bash 的 PID 被存入了 cgroup.procs,故继续创建子进程会超出 CGroup 中的限制而产生错误:
$ cat /sys/fs/cgroup/pids/example/pids.max
1
$ cat /sys/fs/cgroup/pids/example/pids.current
1
$ cat /sys/fs/cgroup/pids/example/cgroup.procs
15543
继续在上面环境的基础上,打开另一个 bash,在 CGroup example 下再创建一个子 CGroup sub_ex,设置 example 中的 pids.max 为 2,sub_ex 中的 pids.max 为 5,并把当前的 bash 的 PID 写入 sub_ex 中的 cgroup.procs。即使当前的 CGroup sub_ex 的 pids.max 已经设置为 5,再执行任何命令时仍然会报错:
$ echo 2 > /sys/fs/cgroup/pids/example/pids.max
$ mkdir /sys/fs/cgroup/pids/example/sub_ex
$ echo 5 > /sys/fs/cgroup/pids/example/sub_ex/pids.max
$ echo $$ > /sys/fs/cgroup/pids/example/sub_ex/cgroup.procs
$ ls
bash: fork: retry: No child processes
bash: fork: retry: No child processes
bash: fork: retry: No child processes
打开另一个 bash,查看当前 sub_ex 的父 CGroup 中的 pids.max 和 pids.current 都为 2,而 sub_ex 中的 pids.max 为 5,pids.current 为 1,说明子 CGroup 的 pids.max 上限其实由父 CGroup 来决定:
$ cat /sys/fs/cgroup/pids/example/pids.max
2
$ cat /sys/fs/cgroup/pids/example/pids.current
2
$ cat /sys/fs/cgroup/pids/example/sub_ex/pids.max
5
$ cat /sys/fs/cgroup/pids/example/sub_ex/pids.current
1
$ cat /sys/fs/cgroup/pids/example/sub_ex/cgroup.procs
18040
2.1.2. memory
由于 memory 子系统比较消耗资源,所以内核中专门添加了一个参数 cgroup_disable=memory 来禁用 memory 子系统。首先可以定位到已经挂载了的 memory 子系统路径:
$ mount | grep memory
cgroup on /sys/fs/cgroup/memory type cgroup (rw,nosuid,nodev,noexec,relatime,memory)
建立子 CGroup example,可以看到文件夹下生成了很多相关的文件(Ubuntu 默认禁用了 CONFIG_MEMCG_SWAP,所以没有 swap 相关的配置)。这里具体只关注 memory.limit_in_bytes、memory.usage_in_bytes 和 memory.oom_control:
$ mkdir /sys/fs/cgroup/memory/example
$ ls /sys/fs/cgroup/memory/example
cgroup.clone_children       memory.kmem.max_usage_in_bytes      memory.limit_in_bytes            memory.stat
cgroup.event_control        memory.kmem.slabinfo                memory.max_usage_in_bytes        memory.swappiness
cgroup.procs                memory.kmem.tcp.failcnt             memory.move_charge_at_immigrate  memory.usage_in_bytes
memory.failcnt              memory.kmem.tcp.limit_in_bytes      memory.numa_stat                 memory.use_hierarchy
memory.force_empty          memory.kmem.tcp.max_usage_in_bytes  memory.oom_control               notify_on_release
memory.kmem.failcnt         memory.kmem.tcp.usage_in_bytes      memory.pressure_level            tasks
memory.kmem.limit_in_bytes  memory.kmem.usage_in_bytes          memory.soft_limit_in_bytes
修改 memory.limit_in_bytes 可以对内存的使用大小进行分配:
$ echo 1M > /sys/fs/cgroup/memory/example/memory.limit_in_bytes
$ cat /sys/fs/cgroup/memory/example/memory.limit_in_bytes
1048576
$ echo -1 > /sys/fs/cgroup/memory/example/memory.limit_in_bytes
$ cat /sys/fs/cgroup/memory/example/memory.limit_in_bytes
9223372036854771712
在 memory.usage_in_bytes 中存储了当前正在使用的内存大小,如果此时将 memory.limit_in_bytes 修改为更小的值,会产生错误:
$ echo $$ > /sys/fs/cgroup/memory/example/cgroup.procs
$ cat /sys/fs/cgroup/memory/example/memory.usage_in_bytes
86016
$ echo 50K > /sys/fs/cgroup/memory/example/memory.limit_in_bytes
echo: write error: device or resource busy
使用 memory.oom_control 可以对内存过度分配进行控制。以下面程序为例:
#include <stdio.h>
#include <stdlib.h>
#include <string.h>
#include <unistd.h>

#define SIZE (1024*1024)

int main() {
    void *arr[10];
    int i = 0;
    while (i < 10) {
        arr[i] = malloc(SIZE);
        memset(arr[i], 0, SIZE);
        printf("%dM memory allocatted => %p\n", ++i, arr[i]);
        sleep(1);
    }
    while (--i) {
        free(arr[i]);
        printf("freed => %p\n", arr[i]);
        sleep(1);
    }
    return 0;
}
设置 memory.limit_in_bytes 为 5M,并执行 ./mem-allocator,在分配 5M 内存时会强制 kill 程序:
$ echo 5M > /sys/fs/cgroup/memory/example/memory.limit_in_bytes
$ cat /sys/fs/cgroup/memory/example/memory.oom_control
oom_kill_disable 0
under_oom 0
$ echo $$ > /sys/fs/cgroup/memory/example/cgroup.proc
$ ./mem-allocator
1M memory allocatted
2M memory allocatted
3M memory allocatted
4M memory allocatted
[1]    13837 killed     ./mem-allocator
如果设置 memory.oom_control 中的 oom_kill_disable 为 1,程序就会在将要分配 5M 时停下来:
$ echo 1 > /sys/fs/cgroup/memory/example/memory.oom_control
$ cat /sys/fs/cgroup/memory/example/memory.oom_control
oom_kill_disable 1
under_oom 0
$ ./mem-allocator
1M memory allocatted
2M memory allocatted
3M memory allocatted
4M memory allocatted
此时修改 memory.limit_in_bytes 为更大的值 7M:
$ echo 7M > /sys/fs/cgroup/memory/example/memory.limit_in_bytes
就可以看到 ./mem-allocator 会继续执行并分配内存,直到会分配到 7M 内存时停下来:
$ ./mem-allocator
1M memory allocatted
2M memory allocatted
3M memory allocatted
4M memory allocatted
5M memory allocatted
6M memory allocatted
2.1.3. cpu
查看挂载了子系统 cpu 的目录路径,这里主要关注 cpu.cfs_quota_us 和 cpu.cfs_period_us:
$ mount | grep cpu
cgroup on /sys/fs/cgroup/cpuset type cgroup (rw,nosuid,nodev,noexec,relatime,cpuset)
cgroup on /sys/fs/cgroup/cpu,cpuacct type cgroup (rw,nosuid,nodev,noexec,relatime,cpu,cpuacct)
下面对一个无限循环的例子(占用 100% CPU)进行测试:
$ cat << EOT > ./takeover.sh
#!/bin/bash
x=0
while [ 1 ] ; do
    x=$x+1
done
EOT
这里使用 cgcreate、cgset、cgexec、cgdelete 一系列命令进行设置。首先创建子 CGroup cpulimited,并设置其中 cpu.cfs_quota_us 的值为 50000。并执行 ./takeover.sh。其中 cpu.cfs_period_us 用来配置时间周期长度,cpu.cfs_quota_us 用来配置当前 CGroup 在周期长度内能使用的 CPU 时间数:
$ cgcreate -g cpu:/cpulimited # 在cpu子系统下创建资源组cpulimited
$ cgset -r cpu.cfs_quota_us=50000 cpulimited # 设置cpulimited中cpu.cfs_quota_us的值为5000
$ cat /sys/fs/cgroup/cpu/cpulimited/cpu.cfs_period_us # cpu.cfs_period_us的值默认是
100000
$ cat /sys/fs/cgroup/cpu/cpulimited/cpu.cfs_quota_us # cpu.cfs_quota_us的值为cpu.cfs_period_us的一半
50000
$ cgexec -g cpu:cpulimited ./takeover.sh > /dev/null &
使用 top 命令查看 CPU 占用情况,该进程只占用了 50%:
$ top
...
  PID USER      PR  NI    VIRT    RES    SHR S %CPU %MEM     TIME+ COMMAND
 2942 root      25   5   13416   3728   2880 R 50.0  0.2   0:17.45 takeover.sh
...
创建子 CGroup nocpulimited,不作任何修改并执行 ./takeover.sh:
$ cgcreate -g cpu:/nocpulimited # 在cpu子系统下创建资源组nocpulimited
$ cat /sys/fs/cgroup/cpu/nocpulimited/cpu.cfs_quota_us # cpu.cfs_quota_us的值为-1,即不生效
-1
$ cgexec -g cpu:nocpulimited ./takeover.sh > /dev/null &
使用 top 命令查看 CPU 占用情况,该进程几乎占用了 100%:
$ top
...
  PID USER      PR  NI    VIRT    RES    SHR S %CPU %MEM     TIME+ COMMAND
 3064 root      25   5   14312   4552   2808 R 95.7  0.2   0:43.07 takeover.sh
...
2.2. Namespace
Namespace 是 Linux 内核用来隔离内核资源的方式。通过 Namespace 可以让一些进程只能看到与自己相关的一部分资源,不同的 Namespace 之间感觉不到对方的存在,从而产生一种它就是一个独立的系统的错觉。改变一个 Namespace 中的系统资源只会影响当前 Namespace 里的进程,对其他 Namespace 中的进程没有影响。
2.2.1. 三种系统调用
| 系统调用 | 作用 |
|---|---|
clone() |
创建一个新进程并放入新的 Namespace 中 |
unshare() |
使当前进程退出制定类型的 Namespace 并加入新创建的 Namespace |
setns() |
把当前进程加入已有的 Namespace |
可以查看 /proc/$PID/ns,定义了所有的 Namespace,并且使用 inode 对不同的 Namespace 进行区分(下面的版本号是指将 Namespace 放入 /proc/$PID/ns 时的 Linux 版本):
$ ls -l /proc/self/ns
total 0
lrwxrwxrwx 1 root root 0 Dec 21 17:30 cgroup -> cgroup:[4026531835] # since linux 4.6
lrwxrwxrwx 1 root root 0 Dec 21 17:30 ipc -> ipc:[4026531839] # since linux 3.0
lrwxrwxrwx 1 root root 0 Dec 21 17:30 mnt -> mnt:[4026531840] # since linux 3.8
lrwxrwxrwx 1 root root 0 Dec 21 17:30 net -> net:[4026531957] # since linux 3.0
lrwxrwxrwx 1 root root 0 Dec 21 17:30 pid -> pid:[4026531836] # since linux 3.8
lrwxrwxrwx 1 root root 0 Dec 21 17:30 user -> user:[4026531837] # since linux 3.8
lrwxrwxrwx 1 root root 0 Dec 21 17:30 uts -> uts:[4026531838] # since linux 3.0
使用 mount 可以挂载某个 Namespace 链接,可以看到两者的 inode 相同:
$ touch uts
$ mount --bind /proc/self/ns/uts ./uts
$ stat ./uts
  File: './uts'
  Size: 0         	Blocks: 0          IO Block: 4096   regular empty file
Device: 3h/3d	Inode: 4026531838  Links: 1
Access: (0444/-r--r--r--)  Uid: (    0/    root)   Gid: (    0/    root)
Access: 2020-12-21 17:34:29.089163406 +0800
Modify: 2020-12-21 17:34:29.089163406 +0800
Change: 2020-12-21 17:34:29.089163406 +0800
 Birth: -
2.2.2. Different Namespaces
以下面的代码为例,对几种不同的 Namespace 进行测试:
#define _GNU_SOURCE
#include <stdio.h>
#include <sched.h>
#include <stdlib.h>
#include <signal.h>
#include <string.h>
#include <unistd.h>
#include <sys/types.h>
#include <sys/wait.h>
#include <sys/mount.h>

#define STACK_SIZE (1024 * 1024)
static char container_stack[STACK_SIZE]; // 定义一个给clone用的栈,栈大小1M
char *container_hostname = "container";

char* const container_args[] = {
    "/bin/bash",
    NULL
};

int container_main(void* arg) {
    printf("Container - inside the container!\n");
    sethostname(container_hostname, strlen(container_hostname)); // 设置hostname
    execv(container_args[0], container_args); // 直接执行一个shell,以便观察进程空间的资源是否被隔离
    printf("Something's wrong!\n");
    return 1;
}

int main() {
    printf("Parent - start a container!\n");
    int flags = CLONE_NEWUTS | CLONE_NEWIPC | CLONE_NEWNS | CLONE_NEWPID | CLONE_NEWNET | CLONE_NEWUSER | SIGCHLD;
    int container_pid = clone(container_main, container_stack+STACK_SIZE, flags, NULL); // 调用clone函数,其中传入一个函数,还有一个栈空间的(为什么传尾指针,因为栈从高地址往低地址生长)
    waitpid(container_pid, NULL, 0); // 等待子进程结束
    printf("Parent - container stopped!\n");
    return 0;
}
2.2.2.1. CLONE_NEWUTS
CLONE_NEWUTS 用于对主机名与域名进行隔离。未设置 CLONE_NEWUTS 标识:
$ ./clone-example
Parent - start a container!
Container - inside the container!
root@iZ2zecelicizfr2e28zon3Z:~/C/container$ hostname
iZ2zecelicizfr2e28zon3Z
root@iZ2zecelicizfr2e28zon3Z:~/C/container$ exit
Parent - container stopped!
设置 CLONE_NEWUTS 标识后:
$ ./clone-example
Parent - start a container!
Container - inside the container!
root@container:~/C/container$ hostname
container
root@container:~/C/container$ exit
Parent - container stopped!
2.2.2.2. CLONE_NEWIPC
CLONE_NEWIPC 用于对信号量、消息队列和共享内存的隔离。未设置 CLONE_NEWIPC 标识:
$ ./clone-example
Parent - start a container!
Container - inside the container!
root@container:~/C/container# ipcs -a

------ Message Queues --------
key        msqid      owner      perms      used-bytes   messages

------ Shared Memory Segments --------
key        shmid      owner      perms      bytes      nattch     status
0x0052e2c1 0          postgres   600        56         5

------ Semaphore Arrays --------
key        semid      owner      perms      nsems
0x0052e2c1 0          postgres   600        17
0x0052e2c2 32769      postgres   600        17
0x0052e2c3 65538      postgres   600        17
0x0052e2c4 98307      postgres   600        17
0x0052e2c5 131076     postgres   600        17
0x0052e2c6 163845     postgres   600        17
0x0052e2c7 196614     postgres   600        17
0x0052e2c8 229383     postgres   600        17
设置 CLONE_NEWIPC 标识后:
$ ./clone-example
Parent - start a container!
Container - inside the container!
root@container:~/C/container# ipcs -a

------ Message Queues --------
key        msqid      owner      perms      used-bytes   messages

------ Shared Memory Segments --------
key        shmid      owner      perms      bytes      nattch     status

------ Semaphore Arrays --------
key        semid      owner      perms      nsems
2.2.2.3. CLONE_NEWNS
CLONE_NEWNS 用于对挂载点(Mount)的隔离。
2.2.2.4. CLONE_NEWPID
CLONE_NEWPID 用于对进程号的隔离。不管设置标识与否,执行 ps -a 命令是没有变化的,因为 ps、top 等命令会去读 /proc 文件系统,而 /proc 文件系统在父进程和子进程都是一样的,所以显示也都是一样的。
unshare() 和 setns() 系统调用对 PID Namespace 的处理不太相同。当使用 unshare() 时,调用进程会为它的子进程分配一个新的 PID Namespace,但是调用进程本身不会被移到新的 Namespace 中,且调用进程第一个创建的子进程在新 Namespace 中的 PID 为 1,并成为新 Namespace 中的 init 进程。为什么唯独 PID Namespace 和其他 Namespace 不一样呢?因为调用 getpid() 函数得到的 PID 是根据调用者所在的 PID Namespace 而决定返回哪个 PID,进入新的 PID Namespace 会导致 PID 产生变化。而对用户态的程序和库函数来说,他们都认为进程的 PID 是一个常量,PID 的变化会引起这些进程奔溃。换句话说,一旦程序进程创建以后,那么它的 PID Namespace 的关系就确定下来了,进程不会变更他们对应的 PID Namespace。使用 unshare() 创建子进程,可以看到在新 Namespace 中的 init 进程即为该子进程:
$ unshare --fork --pid --mount-proc bash
$ ps aux
USER       PID %CPU %MEM    VSZ   RSS TTY      STAT START   TIME COMMAND
root         1  0.0  0.1  21272  3784 pts/1    S    16:38   0:00 bash
root        12  0.0  0.1  37360  3108 pts/1    R+   16:38   0:00 ps aux
因为 init 进程需要有进程监控和资源回收的能力,而在 Docker 中,也提供了 --init 参数来处理:
$ docker run --rm alpine ps
PID   USER     TIME  COMMAND
    1 root      0:00 ps

$ docker run --rm --init alpine ps
PID   USER     TIME  COMMAND
    1 root      0:00 /sbin/docker-init -- ps
    7 root      0:00 ps
2.2.2.5. CLONE_NEWNET
CLONE_NEWNET 用于对网络设备、网络栈、端口等的隔离。
2.2.2.6. CLONE_NEWUSER
CLONE_NEWUSER 用于对用户和用户组的隔离。未设置 CLONE_NEWUSER 标识:
$ ./clone-example
Parent - start a container!
Container - inside the container!
root@container:~/C/container# exit
Parent - container stopped!
设置 CLONE_NEWUSER 标识后:
$ ./clone-example
Parent - start a container!
Container - inside the container!
nobody@container:~/C/container$ exit
Parent - container stopped!
2.2.2.7. CLONE_NEWCGROUP
内核从 4.6 开始,支持 CGroup Namespace。在这之前,在一个容器查看 /proc/$PID/cgroup,或者在容器挂载 CGroup 时,会看到整个系统的 CGroup 信息:
$ docker run -it --rm busybox /bin/sh
/ # uname -r
4.19.121-linuxkit
/ # cat /proc/self/cgroup
14:name=systemd:/docker/de737414a590ee66e024c9053508e84ea81739d66c5a68f22527e43ddc4c5e08
13:rdma:/
12:pids:/docker/de737414a590ee66e024c9053508e84ea81739d66c5a68f22527e43ddc4c5e08
11:hugetlb:/docker/de737414a590ee66e024c9053508e84ea81739d66c5a68f22527e43ddc4c5e08
10:net_prio:/docker/de737414a590ee66e024c9053508e84ea81739d66c5a68f22527e43ddc4c5e08
9:perf_event:/docker/de737414a590ee66e024c9053508e84ea81739d66c5a68f22527e43ddc4c5e08
8:net_cls:/docker/de737414a590ee66e024c9053508e84ea81739d66c5a68f22527e43ddc4c5e08
7:freezer:/docker/de737414a590ee66e024c9053508e84ea81739d66c5a68f22527e43ddc4c5e08
6:devices:/docker/de737414a590ee66e024c9053508e84ea81739d66c5a68f22527e43ddc4c5e08
5:memory:/docker/de737414a590ee66e024c9053508e84ea81739d66c5a68f22527e43ddc4c5e08
4:blkio:/docker/de737414a590ee66e024c9053508e84ea81739d66c5a68f22527e43ddc4c5e08
3:cpuacct:/docker/de737414a590ee66e024c9053508e84ea81739d66c5a68f22527e43ddc4c5e08
2:cpu:/docker/de737414a590ee66e024c9053508e84ea81739d66c5a68f22527e43ddc4c5e08
1:cpuset:/docker/de737414a590ee66e024c9053508e84ea81739d66c5a68f22527e43ddc4c5e08
CGroup Namespace 的实现比 lxcfs 更安全。容器中一旦挂载 cgroup filesystem,可以修改整全局的 CGroup 配置,存在一定的安全隐患。如果想在容器内部运行 systemd,我们希望每个容器都自己的 CGroup 结构,可以使用 CGroup Namespace 来解决这一问题。使用 CGroup Namespace 后,每个 Namespace 中的进程都有自己 cgroupns root 和 cgroup filesystem 视图,使得在容器中也可以安全的使用 CGroup。同时使容器迁移更加容易,/proc/self/cgroup 需要复制到目标机器,这要求容器的 CGroup 路径是唯一的,否则可能会与目标机器冲突。有了 CGroup Namespace,每个容器都有自己的 cgroup filesystem 视图,不用担心这种冲突。
3. References
「Docker」 - 虚拟化 & 容器 - isisiwish
linux namespace 和 cgroup 的区别?
深挖 Docker 之 Linux namespace 和 cgroups - Vincent
Linux Namespace 和 Cgroup
Linux 的 Namespace 与 Cgroups 介绍 - 星辰大海ゞ
容器核心技术–Cgroup 与 Namespace - 小码弟
利用 Cgroups 的 pids 子系统限制进程(线程)数量 - Chen Fu
Cgroups 与 Systemd - 返回主页 sparkdev
容器 Cgroup 和 Namespace 特性简介 - nudt_qxx
linux namespace and cgroup - 王磊-AI 基础