Cloud Manager
开源云主机管理平台调研。
1. 需求
轻量级云管理平台?
- 网络(划分 VLAN)
- 服务器资源(集群/多节点)
- 兼容性(KVM/Xen、数据库)
- 修改难易程度(删减不需要的模块)
- 部署测试
2. 云管理平台
2.1. ZStack
基于 Java,使用 Maven 进行编译
2.1.1. 企业付费版
一款产品化的 IaaS(基础设施即服务)软件,通过提供统一的平台来管理包括计算,网络,存储在内的数据中心资源。
- 网络
- 服务器资源
- 兼容性
- 修改难易程度
- 部署测试
2.1.2. 社区开源版
提供基础的计算,网络,存储等 IaaS 软件的功能,可以免费申请下载。
- 网络
- 服务器资源
- 兼容性
- 修改难易程度
- 部署测试
2.1.3. 编译
更新 yum 源,安装相关依赖:
$ curl -o /etc/yum.repos.d/CentOS-Base.repo http://mirrors.aliyun.com/repo/Centos-7.repo
$ yum clean all
$ yum makecache
$ yum install -y vim tmux wget curl maven ant mariadb-server git zip unzip patch python-setuptools
下载 ZStack 源码:
$ git clone https://github.com/zstackio/zstack.git -b 2.0.2
$ git clone https://github.com/zstackio/zstack-utility.git -b 2.0.2
$ git clone https://github.com/zstackio/zstack-dashboard.git
$ git clone https://github.com/zstackio/zstack-vyos.git
下载 Tomcat 包:
$ wget https://archive.apache.org/dist/tomcat/tomcat-7/v7.0.35/bin/apache-tomcat-7.0.35.zip
安装 Golang 环境:
$ wget https://mirrors.nju.edu.cn/golang/go1.10.8.linux-amd64.tar.gz
$ tar -C /usr/local -xvzf go1.10.8.linux-amd64.tar.gz
$ vim ~/.bashrc
export GOROOT=/usr/local/go
export PATH=$PATH:$GOROOT/bin
给 zstack 打上以下补丁:
diff --git a/core/src/main/java/org/zstack/core/ScatteredValidator.java b/core/src/main/java/org/zstack/core/ScatteredValidator.jar.java b/core/src/main/java/org/zstack/core/ScatteredValidator.java
index f983e91..297588a 100755
--- a/core/src/main/java/org/zstack/core/ScatteredValidator.java
+++ b/core/src/main/java/org/zstack/core/ScatteredValidator.java
@@ -1,6 +1,5 @@
 package org.zstack.core;

-import com.sun.org.apache.regexp.internal.RE;
 import org.zstack.header.errorcode.OperationFailureException;
 import org.zstack.header.exception.CloudRuntimeException;
 import org.zstack.utils.DebugUtils;
给 zstack-utility 打上以下补丁:
diff --git a/zstackbuild/build.properties b/zstackbuild/build.properties
index 682d6b01..ccda4316 100644
--- a/zstackbuild/build.properties
+++ b/zstackbuild/build.properties
@@ -1,6 +1,6 @@
 zstack_build_root=/usr/local/zstack/root/
 #the git repository version for build
-build_version=master
+build_version=2.0.2
 product.name=ZStack
 #product.version=1.0.1
 product.bin.name=zstack-installer
@@ -22,7 +22,7 @@ apachetomcat.pkg=${zstack_build_root}/apache-tomcat-7.0.35.zip

 # For UI 1.x
 zstackdashboard.source=${zstack_build_root}/zstack-dashboard
-mevocoui.source=${zstack_build_root}/mevoco-ui
+#mevocoui.source=${zstack_build_root}/mevoco-ui
 zstackdashboard.build_version=${build_version}
 #zstackdashboard.source=${zstack_build_root}/zstack-ui
 #zstackdashboard.build_version=master
@@ -113,4 +113,4 @@ zstack.ui.source=${zstack_build_root}/zstack-ui
 build.zstack.ui.war.script=${zstackbuild.scripts}/build_zstack_ui_war.sh
 mevocoui2.build_version=${build_version}
 mevocouiserver.build_version=${build_version}
-build.zstack.ui.war=true
+build.zstack.ui.war=false
diff --git a/zstackbuild/build.xml b/zstackbuild/build.xml
index 96b61f5f..1d746fa2 100644
--- a/zstackbuild/build.xml
+++ b/zstackbuild/build.xml
@@ -267,9 +267,6 @@
             <sequential>
                 <antcall target="build-zstack-vyos"/>
             </sequential>
-            <sequential>
-                <antcall target="check-zstack-distro"/>
-            </sequential>
         </parallel>
     </target>
更换 maven 镜像:
  <mirrors>
    <mirror>
      <id>aliyun</id>
      <mirrorOf>*</mirrorOf>
      <name>Aliyun Mirror</name>
      <url>https://maven.aliyun.com/repository/public</url>
    </mirror>
  </mirrors>
编译 zstack:
$ cd zstack && mvn -DskipTests clean install
编译 zstack-utility 并生成安装包:
$ cd zstack-utility/zstackbuild
$ ant -Dzstack_build_root=$ZSTACK_HOME -Dzstack.build_version=2.0.2 -Dzstack-utiltiy.build_version=2.0.2 -Dzstackdashboard.build_version=master all-in-one
使用 ZStack-x86_64-DVD-2.0.2.iso 安装 Expert Mode,然后上传编译的 bash 脚本,安装部署编译的版本:
$ bash zstack-installer-2.0.2.bin -i
使用安装好的 zstack-ctl 工具对数据库和 UI 进行安装:
$ zstack-ctl install_db --host=192.168.1.101
$ zstack-ctl install_rabbitmq --host=192.168.1.101
$ zstack-ctl install_ui
部署数据库:
$ zstack-ctl deploydb --host=192.168.1.101
启动管理节点服务:
$ zstack-ctl start_node
启动 Web UI 服务:
$ zstack-ctl start_ui
2.2. OpenStack
基于 Python
Devstack 是一套给开发人员快速部署 OpenStack 开发环境的脚本,不适用于生产环境。Devstack 将自动下载源代码,自动执行所有服务的安装脚本,自动生成正确的配置文件,自动安装依赖的软件包。
- 网络:使用有问题
- 服务器资源
- 兼容性
- 修改难易程度:代码复杂
- 部署测试:编译安装成功
2.2.1. 安装
2.3. Apache CloudStack
基于 Java
Apache CloudStack 是一个开放源代码的基础架构即服务平台,该平台管理和协调存储,网络和计算机资源池以构建公共或私有 IaaS 计算云。
- 网络
- 服务器资源
- 兼容性
- 修改难易程度
- 部署测试:编译成功
2.3.1. 安装
安装基础的依赖:
$ cat << EOT > /etc/yum.repos.d/mysql.repo
[mysql-community]
name=MySQL Community connectors
baseurl=http://repo.mysql.com/yum/mysql-connectors-community/el/$releasever/$basearch/
gpgkey=http://repo.mysql.com/RPM-GPG-KEY-mysql
enabled=1
gpgcheck=1

[mysql-8.0-community]
name=MySQL Community connectors 8.0
baseurl=http://repo.mysql.com/yum/mysql-8.0-community/el/$releasever/$basearch/
gpgkey=http://repo.mysql.com/RPM-GPG-KEY-mysql
enabled=1
gpgcheck=1
EOT
$ yum makecache
$ yum install -y mysql-connector-python
$ yum groupinstall -y "Development Tools"
$ yum install -y java-11-openjdk-devel.x86_64 genisoimage mysql mysql-server ws-commons-util MySQL-python python-setuptools createrepo
2.3.2. 编译
安装依赖软件(MySQL-5):
$ yum install -y epel-release
$ yum localinstall -y http://dev.mysql.com/get/mysql-community-release-el7-5.noarch.rpm
$ yum makecache
$ yum install -y java-1.8.0-openjdk-devel maven python-setuptools python-pip genisoimage git mysql-community-server
使用 Maven-3.5.0 以及 Java-1.8:
$ wget https://archive.apache.org/dist/maven/maven-3/3.5.0/binaries/apache-maven-3.5.0-bin.tar.gz
$ tar -zxvf apache-maven-3.5.0-bin.tar.gz
$ export PATH=$HOME/apache-maven-3.5.0/bin:$PATH
$ export JAVA_HOME=/usr/lib/jvm/java-1.8.0-openjdk
$ export PATH=$JAVA_HOME/bin:$PATH
获取 MySQL 的默认密码:
$ grep 'temporary password' /var/log/mysqld.log
$ vim utils/conf/db.properties
修改 MySQL 密码:
# mysql5.6
$ mysqladmin -uroot -p$OLD_PASS password ''
# mysql8
$ mysql -uroot -p
mysql> UNINSTALL COMPONENT "file://component_validate_password";
编译以及部署:
$ mvn -DskipTests -Pdeveloper,systemvm clean install
$ mvn -P developer -pl developer -Ddeploydb
$ mvn -pl :cloud-client-ui jetty:run
2.4. OpenNebula
基于 Ruby、C、JS
- 网络
- 服务器资源
- 兼容性
- 修改难易程度
- 部署测试
2.4.1. 安装
添加软件包:
$ cat << EOT > /etc/yum.repos.d/opennebula.repo
[opennebula]
name=opennebula
baseurl=https://downloads.opennebula.io/repo/5.12/CentOS/7/x86_64
enabled=1
gpgcheck=0
EOT
安装相关依赖:
$ yum makecache
$ yum install -y epel-release
$ yum install -y opennebula-server opennebula-sunstone opennebula-ruby opennebula-gate opennebula-flow
安装 Ruby 版本控制软件以及相关插件:
$ git clone https://github.com/rbenv/rbenv.git ~/.rbenv
$ echo 'export PATH="$HOME/.rbenv/bin:$PATH"' >> ~/.bashrc && source ~/.bashrc
$ echo 'eval "$(rbenv init -)"' >> ~/.bashrc && source ~/.bashrc
$ mkdir -p "$(rbenv root)"/plugins
$ git clone https://github.com/rbenv/ruby-build.git "$(rbenv root)"/plugins/ruby-build
$ git clone https://github.com/andorchen/rbenv-china-mirror.git "$(rbenv root)"/plugins/rbenv-china-mirror
$ gem sources --add https://mirrors.tuna.tsinghua.edu.cn/rubygems/ --remove https://rubygems.org/
安装 Ruby-2.6.0 并下载 OpenNebula 相关 Gem 包:
$ yum install -y bzip2 gcc openssl-devel readline-devel zlib-devel
$ rbenv install 2.6.0
$ rbenv global 2.6.0
$ /usr/share/one/install_gems
关闭或清空防火墙,关闭 SELinux:
$ systemctl stop firewalld
$ iptables -F
$ setenforce 0
设置桥接网络:
$ yum install -y bridge-utils
$ cat << EOT > /etc/sysconfig/network-scripts/ifcfg-br0
TYPE=Bridge
BOOTPROTO=static
NAME=br0
DEVICE=br0
ONBOOT=yes
IPADDR=192.168.xxx.xxx
NETMASK=255.255.255.0
GATEWAY=192.168.xxx.1
DNS1=114.114.114.114
NM_CONTROLLED=no
EOT
$ cat << EOT >> /etc/sysconfig/network-scripts/ifcfg-eth0
BRIDGE=br0
NM_CONTROLLED=no
EOT
$ systemctl restart network
3. Summary
| 云管理平台 | 网络 | 资源 | 兼容性 | 修改 | 部署 |
|---|---|---|---|---|---|
| ZStack Enterprise | ✓ | ✗ | ✓ | ✗ | ✓ |
| ZStack Community | ✗ | ✓ | ✓ | ✗ | ✓ |
| OpenStack | ✓ | ✗ | ✗ | ||
| Apache Cloudstack | ✗ | ✗ | |||
| OpenNebula | ✗ | ✗ |
4. 更换网卡名称
修改内核配置,在 GRUB_CMDLINE_LINUX 中增加 net.ifnames=0 biosdevname=0 选项:
$ vim /etc/default/grub
...
GRUB_CMDLINE_LINUX="noibrs noibpb nopti nospectre_v2 nospectre_v1 l1tf=off nospec_store_bypass_disable no_stf_barrier mds=off mitigations=off crashkernel=auto rd.lvm.lv=zstack/root rd.lvm.lv=zstack/swap net.ifnames=0 biosdevname=0 rhgb quiet"
...
$ grub2-mkconfig -o /boot/grub2/grub.cfg
修改网卡名称:
$ ip link set ens192 down
$ ip link set ens192 name em2
$ ip link set em2 up
更改网卡信息:
$ mv /etc/sysconfig/network-scripts/ifcfg-ens192 /etc/sysconfig/network-scripts/ifcfg-em2
$ vim /etc/sysconfig/network-scripts/ifcfg-em2
...
NAME="em2"
...
DEVICE="em2"
...
创建 70-persistent-net.rules 应用永久更改:
$ MAC=$(ifconfig em2 | grep ether | awk '{print $2}')
$ cat << EOT > /etc/udev/rules.d/70-persistent-net.rules
ACTION=="add", SUBSYSTEM=="net", DRIVERS=="?*", ATTR{address}=="$MAC", NAME="em2"
EOT
5. References
The Top Nine Open Source Cloud Management Platforms
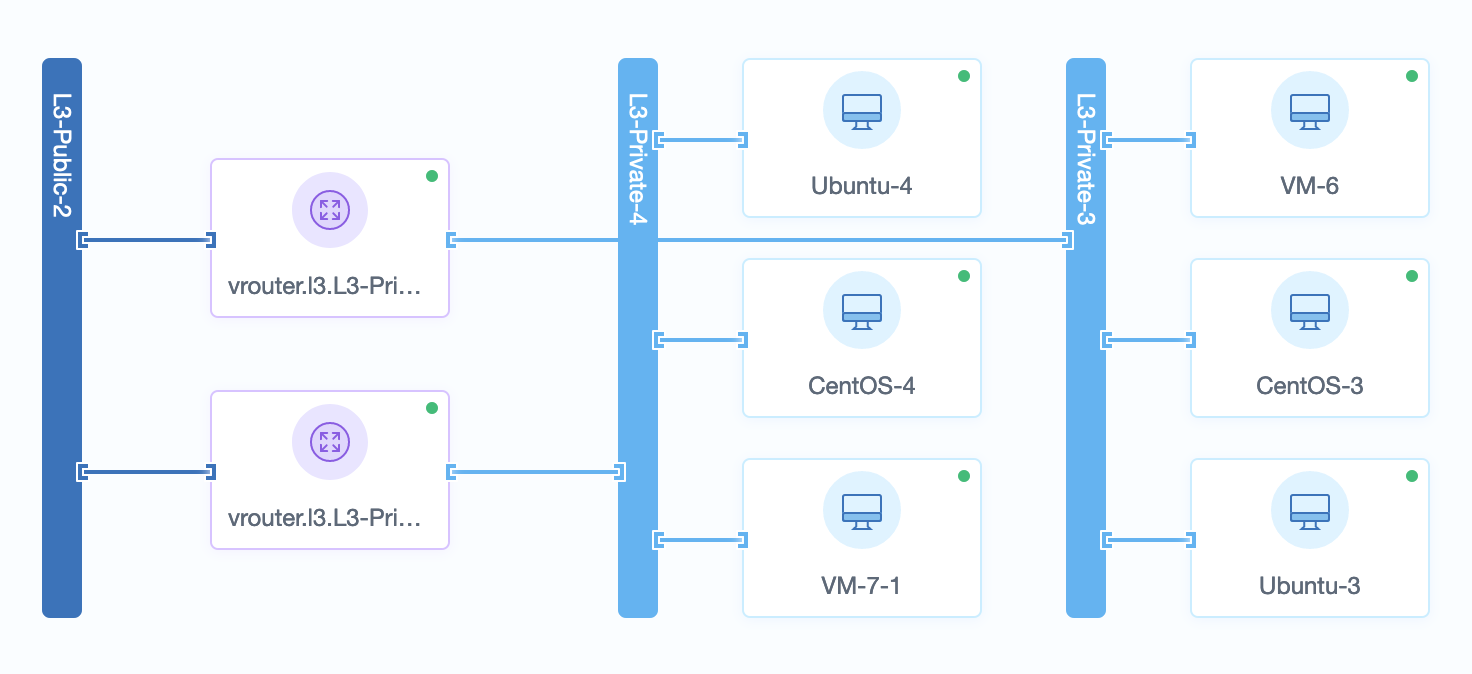
ZStack–网络模型 1:L2 和 L3 网络 - ZStack 上海云轴
zstack 源码安装 - 走在成长的道路上
如何将使用原生 Centos 系统安装的物理机添加为计算节点
Centos7 安装 OpenNebula - Fenng27
opennebula(一)在 Centos7.5 上部署 - iblk
How To Rename Network Ethernet Cards in CentOS7/RHEL7
CentOS 7.x 系统添加 70-persistent-net.rules 文件,来实现网卡名称自定义 - q35445762
CentOS 7 - Rename network interface without rebooting
Manual Installation - ZStack Installation
Getting Started With Manual Installation - ZStack Installation
云平台其他运维 - 运维手册 - ZStack